Thursday, December 10, 2009

Yummiest Prettiest Pancakes!

We got an early Christmas present from my sister in law that I am already loving! (I got in a little trouble from Zac for opening it early) It was all the fixins to make pancakes really fun.

First of all, this mix was the most delightful pancake mix I've ever used. They were seriously amazing taste wise. I don't know why I ever bother with making them from scratch!


This tool makes pancakes a very creative, fun activity! You must the mix inside and you can use it as a "pen" to make different designs for pancakes. I didn't take pictures of my creations, but I did make a Christmas tree, the letter T, a car, and a blob. :) It is the best kitchen tool!

Then these are the crowning jewel of pancake making! It's basically a cookie cutter but for pancakes. I got reindeer, elf, and a snowman that are all way cute!


Fun, Fun! Thank you Rebekah! What a fun breakfast! I would recommend a pancake pen and pancake molds to everyone out there, and it was a GREAT christmas present!

Sunday, September 13, 2009

Spaghetti from Scratch

Spaghetti is one of those things that I dreaded making for a while because I started hating the store bought spaghetti sauce. It just had a nasty flavor so I didn't make spaghetti for a while. Then I ran across this recipe which is fantastic on allrecipes.com. Everything is from scratch.


You basically mix some tomato sauce, spices and seasons, cooked veggies and meat and let it simmer for an hour or so. It is VERY yummy this way and we love it, but I found a way that is a little cheaper and easier and still yummy.


Ingredients:
2 Large peppers or 3-4 small ones (I like green for spaghetti best)
2 onions
6 cloves of garlic
1.5 lbs of hamburger meat or sausage
2 large cans of spaghetti sauce*
1 tsp Italian Seasoning

*I buy the Hunt brad and usually get it for $.99. With the original recipe I ended up spending $4-5 just on tomato sauce so this saves a few bucks. I know it's not that much, but when you're trying to stick to a budget 2 or 3 dollars a meal makes a huge difference!

OPTIONAL
You can also add a couple cans of tomato sauce if you want it to go further and don't like the sauce too thick. If you do you should add a little sugar, salt, and Italian seasoning.


1. Chop up the veggies
2. Fry the veggies and meat until the meat is cooked, drain off the grease
3. Add the spaghetti sauce and seasons and extra sauce if you want more
4. Let it simmer on the stove for an hour or cook on low in the crockpot for 3 or 4 hours. I like the crockpot method better.
5. Serve over noodles
6. Bag and freeze the extras for lasagna or another spaghetti dinner.

This is really yummy, healthy, cheap, and relatively easy. I love the fact that it makes enough for two full meals. This sauce makes lasagna REMARKABLE! I usually store the extra sauce in the freezer for a few weeks and then make lasagna with the leftovers. Yum

Thursday, August 6, 2009

Sour Cream Chocolate Cake with Fudge Frosting

Alright, this is our favorite chocolate cake around our house. It is a little more expensive to make so We only eat it on special occasions. Luckily, my mom graduated from college so I got to make for her party!

This recipe was found my my husband, Zac. While working at the Sleep Institute he was thumbing through the "Better Homes and Gardens" magazine and he came across the recipe and picture and brought it home. What a find!

Cake:
1.5 C Flour
.5 C unsweetened cocoa powder
1 tsp. Baking Powder
1/2 tsp. Baking Soda
1/2 tsp. Salt
1/2 C. Shortening (I use butter!)
1 1/4 C sugar
1 tsp Vanilla (the real stuff)
3 oz Bittersweet chocolate chips melted and cooled (we use milk choco)
1 8oz carton Sour Cream
2 eggs
1 C milk

1. Mix dry ingredients and set aside
2. Beat sugar and butter until combined and fluffy, beat in eggs, vanilla, chocolate, and sour cream.
3. Alternately add flour mixture and milk.
4. Bake 25 min at 350 in two round cake pans.

The batter is super fluffy and delicious, try not to eat too much before you bake it!

The Frosting
12oz package Semisweet chocolate chips (again I used milk)
1/2 C Butter
8oz Sour cream
4.5 C powdered Sugar

1. Melt Chocolate and Butter in pan on stove, use low heat!
2. Let it cool for 10 minutes
3. Stir in sour cream
4,. Stir in sugar. You really have to whisk super hard for quite a while or use electric mixers to get out all the lumps, but they do eventually stir in (my electric mixer is busted!).

This frosting is good enough to be eaten by the spoonful, and this recipe makes WAY too much unless you really load it on. I made a cake shaped like a graduation cap so I had to frost a piece of cardboard and I still had at least 1/2 cup of frosting leftover. Click on the picture and you'll be able to see the little cake in the middle.
I had to cut off some of the cake because the base of my grad cap was too big, so what do you think I made with the leftovers??? CAKE BALLS! I found a new way of doing them so that they are easier to eat and easier to dip!

1. Break up the cake, mix in enough frosting that they'll roll into balls, but not too much that they stick everywhere.
2. Roll them into balls (I have Zac spray Pam on my hands cause it gets pretty sticky).
3. Melt a small amount of the chocolate for dipping. Dip a toothpick into the chocolate and then into the cake balls.
4. Put them into the fridge or freezer to harden up.
When they are solidified take them out and dip them into the chocolate. Here is a little video demo. When the chocolate started getting to thick and not deep enough in my bowl I started tapping the toothpic on the side of the bowl to get off the excess chocolate.

I made some of them into fancy shmancy graduates.

I used skewers instead of toothpics, then I took a square of Dove chocolate and glued it onto the cake ball with some melted chocolate. I took some sour straws and cut them in fourths first. If you leave them whole they are too thick to droop over the side. After they were skinnier sour straws I cut them the right length for the hats and glued them on with chocolate again. I think they are awesome!
TA DAH: Graduates:


Monday, July 27, 2009

Homemade BBQ pizza is Fantastic!

This is one of our top 5 meals for sure at our house, I LOVE IT and it feels sort of healthy.

I found a great recipe for whole wheat pizza crust here. The only change I make is that I use all wheat flour, no white. My sister new pizza idea is buying the crust, that will definitely speed up the process!

We like thinner crusts at our house so I just sprinkle some flour on the counter, throw down the dough and roll it out until it's pretty thin . Then I put it over our pizza pan like this:

The dough definitely overlaps the pan so I get a pizza cutter and cut off the excess. Thus we have a perfectly thin, and round pizza crust. I let it raise for 15 or 20 minutes then put it in the oven for 5 minutes.
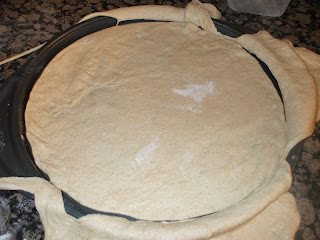
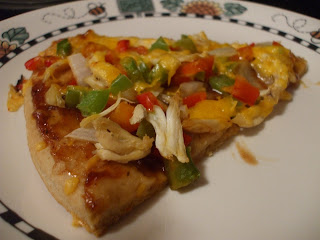
After it's been zapped in the oven we spread the bbq sauce and top it with yummy toppings like peppers, onions, chicken, cheese, tomatoes and any other veggies we have laying around. I put it in the oven for another 8 minutes or so and out comes a delightful pizza!

With the extra dough I made yummy breadsticks (you can see them below). Here's how I make them:
1. Roll out the extra dough, pretty thin
2. Use the pizza cutter to cut into strips.
3. Let raise for 20 minutes or so
4. Cook for 4 minutes
5. Brush with oil and sprinkle on parmesian cheese and garlic salt (those big salts like on preztels would be way good!)
6. Put in the oven for another 5 minutes.


And there you have a yummy, moderately simple recipe that is moderately healthy ( we could have cut back on the cheese :)

Tuesday, July 21, 2009

Strawberry Jam Catastrophe

So I was strolling down the isles of my favorite Henry's Market and I was shocked at the price of strawberries. 77 cents!!!!! I have never seen a pound of strawberries so cheap. So naturally I bought 18 pounds. (This picture is only showing half of them, I have an impulse problem! I was determined to make strawberry Jam so I got the pectin, sugar and strawberries and headed home for the big project.First I took the leaves off of them, I borrowed a GIGANTIC bowl from my neighbor. I don't think you can understand how many strawberries I bought, it was ridiculous.
Here are all of them, they almost took up the whole top shelf of the fridge.
So, I decided to use the freezer jam recipe inside of the pectin package. It called for 8 cups of mashed up strawberries. I didn't have a potato masher so I decided to throw the strawberries into the blender. BAD BAD IDEA! Apparently when you do this the strawberries expand and get all foamy. I didn't realize the problem at this point so I continued following the recipe. 8 cups of strawberries and 16 cups of sugar...seemed like a lot of sugar, but I just went for it. Notice how liquidy the stuff is.
My lovely assistant, Mariela, made the pectin and we added it to the strawberry/sugar mixture. I tasted the final mixture and it was SOOOO SUGARY. I started blending more strawberries and adding them into the mixture. DISASTER! I finally gave up.
I had all these empty cans from my grandma's applesauce so I decided to fill them anyways. The jam is pretty sugary, but I still loved it. It never set up, so I have to use a spoon, but it is great as syrup on pancakes!

After the catastrophe I started asking around and I got some help from family and friends, here are some lessons learned on freezer jam.
1. Just buy a potato masher for $5 and don't use a blender
2. Never add as much sugar as they say. My mom said that she never felt right about adding more sugar than fruit. (I'd like some help in this area still to get a feel for exactly how much sugar to add).
3. NEVER try to reinvent the wheel. I don't know why I didn't ask one of the 15 immediate relatives I have that already know how to make freezer jam for help. Next time I will be smarter!
I still have 5 quart bags full of strawberries that were leftover so I will be trying this again in a while when we run out of jam (probably not any time soon). Hopefully take two will be better!


Friday, June 5, 2009

Red Velvet Cake is a Scam!

Zac volunteered me to bake a Red Velvet Cake for his good friend's wife's surprise birthday party. I was a little nervous since I've never attempted red velvet cake and it sounds hard, but luckily Zac told me that his mom makes a delicious red velvet cake so I called her and gave it a whirl.

The reason it is a SCAM: I thought that there was something special about the ingredients of a red velvet cake that was very different from a normal cake that made it red like cherries or something...not true. You just add red food coloring, shocking. I was so surprised. I think I'll make blue velvet cake next time, just because I can. :) Nevertheless, this was a delicious, moist, WOW cake that I recommend, thank you Shelly for the recipe!

Here's the recipe:

Cake
2.5 C Flour
1.5 C Sugar
2 tsp Cocoa
1 tsp Salt
1 tsp vanilla
1 tsp baking soda
2 eggs
1 C oil
1 C Buttermilk ***
1/4 C Water
red food coloring (as much or little as you want)

Put it all in a big bowl, stir, put in pans, bake at 350 for 20-30 minutes depending on pan, just do the toothpick test. I used my 3 piece set of oval casserole dishes so I had to take them out at different times.
Frosting:
8 oz package softened cream cheese
1 cube real butter
2.5-3 C Powdered Sugar
1 tsp vanilla

Mix it all together and frost. I like to put it in the fridge to harden it up to make frosting it easier.

On my list of things to buy: Something to put a cake on besides a cookie sheet, the cookie sheet is SO tacky! Yuck!

Saturday, May 30, 2009

Chocolate Covered Cake Balls II

I meant to get a picture of the cake balls closer up. I put on a baby shower for my friend today and I attempted to decorate the cake balls. You can click on the picture to get a close up. I melted white chocolate and added food coloring and put it in a little cake decorating thing to decorate the tops but it was SOOOO difficult. The chocolate was all over the place. I definately am not an expert in this field. Oh well, they taste freakin awesome so I didn't care too much.
PS: We put peppers on the veggie tray and they were YUMMY, I've never thought to do that before since I'm not a huge raw pepper fan.

Tuesday, May 26, 2009

Chocolate Covered Cake Balls

I saw these on my friends Lisa's blog and then tried one at my friend Erin's house and I HAD to try them out. I'm doing a babyshower this weekend so I practiced them last weekend so I could get the hang of things. There are about a MILLION varieties using this same idea.
They have also been called 'Bakerella Balls' because that is the original creater. Here is a link to some of her other similar creations: link
1. Bake a cake-I chose chocolate.

2. Let the cake cool completely, then break it up into small pieces. Mix a container of cream cheese frosting with the cake. ( Other people have tried broken up oreos and broken up nutter butters)
3. Roll them into little balls and stick them in the freezer or fridge until they are nice and firm.
4. Dip them in chocolate and return them to the fridge to harden. I dipped them in melted hershey's kisses, melted white chocolate chips, and melted cookies and cream bars. The cookies and cream were definately my favorite! I heard that if you mix a little shortening with the melted chocolate the chocolate sticks better. I'll try that next time!
It makes a LOT, luckily we had plenty of friends to share them with or else I may have gained about 20 lbs! We had 85 balls!

Aunt Jeanne's Potato Salad

If any of you know my Aunt Jeanne you know she is an excellent cook! Her potato salad is excellent and I tried to make it for the second time and I learned some things that I don't want to forget!


1. Make a 1/2 batch!

2. Do not put in too much sweet relish!

3. Do not let the potatoes cook too long!


Here is her recipe:


5 Large potatoes-cubed and boiled

15 hardboiled eggs cut in pieces

1 package of celery hearts chopped up

1 sweet onion finely chopped

1/2 container of cream cheese

3 raw eggs

1/4-1/2 C flour

3/4 C sugar

1/2 tsp salt

1/2 C vinegar

1/2 C water

1/4 bottle honey mustard

1 1/2-2 C Miracle Whip

1 tbl Sweet Relish (add to taste, start small!)


1. Mix the red ingredients until they are really smooth.

2. Bring the green ingredients to a boil on the stove and then add the red ingredients. Mix until they are all smooth and thick then add the purple ingredients. This makes the dressing.

3. Mix the dressing with all of the blue chopped veggies.

4. Enjoy
As you can see from the picture, this recipe makes A LOT of salad! It made a perfect side dish for memorial day!

Wednesday, May 20, 2009

Sweet N' Sour Chicken: the fried variety :)

This was really similar to the sweet n' sour you would get at a chineese restraunt...really good! If I had to rate parts I'd give the chicken a 10 and the sauce a 7, I'm looking for improvements on the sauce so any ideas are welcome. Here is the original recipe with my adjustments.
It basically is veggies and fried chicken over rice all covered in a sweet n' sour sauce...yummy
Sauce:
1. Mix 1/4 c water and 1/4 c cornstarch in a small bowl
2. Mix the following 4 ingredients until they boil, then turn off the heat and slowly add cornstarch while stirring.
Pineapple juice from an 8 oz can
1 1/2 cups water
3/4 cup white sugar
1/2 cup distilled white vinegar
2 drops orange food color
3. Add pineapples
Veggies:
Chop up your favorite veggies, we chose green and orange pepper but if I wasn't so lazy I would have done onions and carrots too. Fry them up in a little butter or oil until they're just soft enough.

Chicken:
1. Mix the following ingredients to make a batter...it kind of resembles a thick pancake batter. Then add 2-3 breasts of chicken that have been cut into little pieces and mix it all up.
2 1/4 cups self-rising flour OR 2 C regular flour, 1/2 tsp salt, and 1 1/2 tsp baking pwdr
2 tablespoons vegetable oil
2 tablespoons cornstarch
1/2 teaspoon salt
1/4 teaspoon ground white pepper
1 egg
2 cups water
2. Heat up the oil( I used medium heat) and use tongs to scoop out the pieces of chicken and plop them into the oil. They cook WAY fast and they are SO good!

I tried to make it in the afternoon and then warm it up that night and the chicken was not nearly as good as it was fresh from the grease...I will remember that for next time. It was literally the best fried chicken I've ever made, you should try it!

Here is the final product, I forgot to take the picture until Zac was already almost done...dang


Friday, May 8, 2009

Chicken Noodle Soup

Alright, this was delicious and I was able to freeze half and save it for next week (the week before finals for my students).


As always the basic recipe was taken from allrecipes.com, but I made a few adjustments.


Ingredients

3 cloves garlic

1/2 chopped onion

5 chopped carrots

3 medium potatoes

1/2 package of cooked noodles

2-3 cans 14.5 oz chicken broth (next time I'll use boullion and water since there is no difference)

1 can vegetable broth

1 can cream of chicken soup

Diced and cooked chicken (I use about 1/2 pound)

1/2 teaspoon dried basil
1/2 teaspoon dried oregano

Chicken Boullion to taste


1. Sautee the veggies in butter for 5-10 minutes.

2. Add in all of the broths, soups, and seasons

3. Let it cook on the stove on medium heat until the carrots are soft.

4. Take it off the heat because if the potatoes cook to long the soup gets all starchy.

5. Add the noodles just before you serve.


When I make it there isn't a lot of the actual soup/broth because I like it that way so add more broth according to how you like it. Also add salt and pepper to your own family's taste. It was a little bland which is why I added a boullion cube. Overall this is a delicious, inexpensive meal that isn't too hard to make. You can chop all the veggies in the morning and throw it all together at night.

Thursday, April 23, 2009

Chicken Broth vs Chicken bouillion with water?????

So, I'm looking around for a yummy chicken noodle soup recipe and I found one that got great reviews. It calls for 4 cans of chicken broth...my question, can I just use my chicken boullion with water? I've never used chicken broth so I'm just wondering what the difference is.

I'm not sure if anyone reads this, but it you know the difference please share your knowledge since I'm NOT experienced in this area.

Tuesday, April 21, 2009

Fruit Cobbler

When I'm trying to be healthy this is what I make for dessert. The problem is that it is so tasty I usually eat half of it the first night. Oh well.
This is the recipe I use and follow to a T for the topping. Cobbler It is basically a cookie with less flour. :) So healthy.
For the Fruit here are the combinations I've tried:
1. Cherries
2. Cherries and Apples
3. Cherries and Strawberries
4. Apples
5. Peaches(canned, I know, I'm lazy) and Strawberries
All of them are delicious. Just lay down whatever fruit you want and pour the topping over top. If you're using sour cherries or apples I would sprinkle sugar over the fruit first. I usually have to let it cook at least an hour sometimes more, for some reason the topping has a really hard time cooking. Any ideas?

Monday, April 20, 2009

The best Slow cooker Beef Stroganoff!

This is a gem of a recipe. I found it here and with over 1500 reviews, I think this ones been perfected. Here is my version of the recipe with all the comments put together.


Ingredients:

-1-2 lbs beef (I get stew meat and cut off some of the fat)

-2 cans GOLDEN MUSHROOM Soup

-1/2 cup water

-1/2 cup chopped onion

-3 cloves chopped garlic

-1 tbl Worcestershire Sauce

-1 beef boullion cube

-1/2 packet onion soup mix

-1 can mushrooms sauted

-4 oz cream cheese

-1 large scoop sour cream


I know there are a ton of ingredients, but I promise this is totally worth it.


Just put everything besides the mushrooms, cream cheese, and sour cream into a crockpot and cook on low for 5-6 hours. Add in the final 3 ingredients and serve over egg noodles or rice.


I've tried with cream of mushroom soup and I thought this was nasty. With golden mushroom soup it is WAYYYY better, I loved this last night! Zac said it was one of his favorites!

Sunday, April 19, 2009

Homemade Pizza

We had BBQ Chicken Pizza and it was yummy. I used this recipe for the crust and it was SO yummy Pizza Crust. It is a great crust recipe and it is really simple. We cover it with BBQ sauce, onions, garlic, peppers, chicken, and cheese. SO good!

The hardest part is making the crust a circle, I'm kind of a professional at it so you could probably learn a lot from this video. ;)

Friday, April 17, 2009

Pigs in a Blanket-this is one for the hubbies!

These were a HUGE hit tonight, Zac loved them and so did Teagan. I liked the taste, but knew they were probably horrible for me so it was too hard to enjoy completely. The best thing about it was that I spent a total of $2 on this meal and it took about 15 minutes to put together. Thank you Kim for the great idea.
Ingredients:
-pre-made biscuits (I got the jumbo size)
-5 or 6 hotdogs
-taco meat
-cheese
For the pigs in a blanket I cut the biscuit into thirds and flattened them out a little. I cut the hotdog in half and then cut them in half again so that the cross-sections were semi-circles. Just wrap the doggies up in the biscuits.

After making a half a cookie sheet of these I decided that I wanted something else for me so I made taco pockets. I took some leftover pork taco meat and cheese and made hot pockets! I'm guessing you could do the same thing with spaghetti sauce or ham and cheese. Maybe I'll jot down some ideas next time I'm walking down the frozen food isle.

I cooked them at 350 for about 2o minutes and they were fantastic. I didn't get a good picture of the finished product because we were too hungry.

As a side note, I made a huge thing of broccoli that we ate while these were cooking so that we would have at least something nutritious. I should have taken a picture for proof!

Wednesday, April 15, 2009

Tostadas

Something about San diego has gotten me excited about Mexican food! My favorite meal lately is tostadas, I am ALWAYS in the mood for them! They are great because you can make it nice and fancy for company or keep it simple on a busy night. Here are a few of our favorite toppings:
1. Pork
--2 cans of sliced green chillies
--3 cloves of garlic chopped up
--3 tbl taco seasoning (I usually add 2 at the beginning and add more at the end if it is too bland)
--1 tbl Chili powder
--1tsp oregano

Just mix all the ingredients into a paste and rub it over a pork roast. I cook mine in a crock pot on low for 6 or 7 hours. About an hour before serving I get a couple forks and shred the meat and adjust seasoning and such and let it cook another hour.

2. Beans
--Beans
--chicken/tomato bullion
--2 cloves of garlic
--onion.

These i have NOT mastered yet. I put everything in a pot with plenty of water and let it cook on low heat until the beans are soft. I usually have to add water a few times through out the cook time. It took 2 hours yesterday!!! They are yummy though. Does anyone have any suggestions, I know canned beans are nice.

3. Rice

I make my rice like normal: twice as much water as rice, but I add the chicken/tomato bullion. The bullion makes a HUGE difference. I find it in the Mexican food isle of my grocery store. This rice is YUMMY!

This pic has the rice, beans and meat, all homemade and yummy! Too much salt, but that's better than fat!


4. Cheese
5. Guacamole- so good, but we never have avocado unless my mom is with us!
6. Lettuce
7. Tomato
8. Sour Cream
9. Ranch
10. Salsa

Pretty much anything goes on these babies. Just pile it all onto a tostada (these are like a huge round chip). We put the cheese down first and zap it in the microwave. yummy!

Thursday, April 9, 2009

Omelets tonight.

Whenever I am not in the mood to cook we have breakfast for dinner. Usually the clean-up and preperation are super easy, what's not to love?

Tonight was omelets. I chopped up some veggies, cheese, and sliced ham in about 10 minutes and with the help of my amazing husband we had the yummiest omelets tonight.

Do you notice the egg arrangement? I have a serious OCD problem with eggs. I have to take them out of the carton in a specific pattern. I had to include them in the picture when I opened the carton and saw the perfect design.

Omelets aren't complicated...but I took pictures and wrote explanations anyways.

1. Pour some egg into a greased pan and let it cook on medium low for a few minutes

2. Pile on the veggies, cheese, and meat to your hearts content. let it keep cooking until the egg isn't too runny.3. Fold it over and let it finish cooking. Zac squishes it with the spatula to make any uncooked egg come out of the omelet and finish cooking on the pan.
4. Enjoy. The great thing was that I dirtied one knife and one pan. Me and Zac were even able to share a plate because I was done eating mine by the time his was done cooking.