Sunday, September 13, 2009

Spaghetti from Scratch

Spaghetti is one of those things that I dreaded making for a while because I started hating the store bought spaghetti sauce. It just had a nasty flavor so I didn't make spaghetti for a while. Then I ran across this recipe which is fantastic on allrecipes.com. Everything is from scratch.


You basically mix some tomato sauce, spices and seasons, cooked veggies and meat and let it simmer for an hour or so. It is VERY yummy this way and we love it, but I found a way that is a little cheaper and easier and still yummy.


Ingredients:
2 Large peppers or 3-4 small ones (I like green for spaghetti best)
2 onions
6 cloves of garlic
1.5 lbs of hamburger meat or sausage
2 large cans of spaghetti sauce*
1 tsp Italian Seasoning

*I buy the Hunt brad and usually get it for $.99. With the original recipe I ended up spending $4-5 just on tomato sauce so this saves a few bucks. I know it's not that much, but when you're trying to stick to a budget 2 or 3 dollars a meal makes a huge difference!

OPTIONAL
You can also add a couple cans of tomato sauce if you want it to go further and don't like the sauce too thick. If you do you should add a little sugar, salt, and Italian seasoning.


1. Chop up the veggies
2. Fry the veggies and meat until the meat is cooked, drain off the grease
3. Add the spaghetti sauce and seasons and extra sauce if you want more
4. Let it simmer on the stove for an hour or cook on low in the crockpot for 3 or 4 hours. I like the crockpot method better.
5. Serve over noodles
6. Bag and freeze the extras for lasagna or another spaghetti dinner.

This is really yummy, healthy, cheap, and relatively easy. I love the fact that it makes enough for two full meals. This sauce makes lasagna REMARKABLE! I usually store the extra sauce in the freezer for a few weeks and then make lasagna with the leftovers. Yum

Thursday, August 6, 2009

Sour Cream Chocolate Cake with Fudge Frosting

Alright, this is our favorite chocolate cake around our house. It is a little more expensive to make so We only eat it on special occasions. Luckily, my mom graduated from college so I got to make for her party!

This recipe was found my my husband, Zac. While working at the Sleep Institute he was thumbing through the "Better Homes and Gardens" magazine and he came across the recipe and picture and brought it home. What a find!

Cake:
1.5 C Flour
.5 C unsweetened cocoa powder
1 tsp. Baking Powder
1/2 tsp. Baking Soda
1/2 tsp. Salt
1/2 C. Shortening (I use butter!)
1 1/4 C sugar
1 tsp Vanilla (the real stuff)
3 oz Bittersweet chocolate chips melted and cooled (we use milk choco)
1 8oz carton Sour Cream
2 eggs
1 C milk

1. Mix dry ingredients and set aside
2. Beat sugar and butter until combined and fluffy, beat in eggs, vanilla, chocolate, and sour cream.
3. Alternately add flour mixture and milk.
4. Bake 25 min at 350 in two round cake pans.

The batter is super fluffy and delicious, try not to eat too much before you bake it!

The Frosting
12oz package Semisweet chocolate chips (again I used milk)
1/2 C Butter
8oz Sour cream
4.5 C powdered Sugar

1. Melt Chocolate and Butter in pan on stove, use low heat!
2. Let it cool for 10 minutes
3. Stir in sour cream
4,. Stir in sugar. You really have to whisk super hard for quite a while or use electric mixers to get out all the lumps, but they do eventually stir in (my electric mixer is busted!).

This frosting is good enough to be eaten by the spoonful, and this recipe makes WAY too much unless you really load it on. I made a cake shaped like a graduation cap so I had to frost a piece of cardboard and I still had at least 1/2 cup of frosting leftover. Click on the picture and you'll be able to see the little cake in the middle.
I had to cut off some of the cake because the base of my grad cap was too big, so what do you think I made with the leftovers??? CAKE BALLS! I found a new way of doing them so that they are easier to eat and easier to dip!

1. Break up the cake, mix in enough frosting that they'll roll into balls, but not too much that they stick everywhere.
2. Roll them into balls (I have Zac spray Pam on my hands cause it gets pretty sticky).
3. Melt a small amount of the chocolate for dipping. Dip a toothpick into the chocolate and then into the cake balls.
4. Put them into the fridge or freezer to harden up.
When they are solidified take them out and dip them into the chocolate. Here is a little video demo. When the chocolate started getting to thick and not deep enough in my bowl I started tapping the toothpic on the side of the bowl to get off the excess chocolate.

I made some of them into fancy shmancy graduates.

I used skewers instead of toothpics, then I took a square of Dove chocolate and glued it onto the cake ball with some melted chocolate. I took some sour straws and cut them in fourths first. If you leave them whole they are too thick to droop over the side. After they were skinnier sour straws I cut them the right length for the hats and glued them on with chocolate again. I think they are awesome!
TA DAH: Graduates:


Monday, July 27, 2009

Homemade BBQ pizza is Fantastic!

This is one of our top 5 meals for sure at our house, I LOVE IT and it feels sort of healthy.

I found a great recipe for whole wheat pizza crust here. The only change I make is that I use all wheat flour, no white. My sister new pizza idea is buying the crust, that will definitely speed up the process!

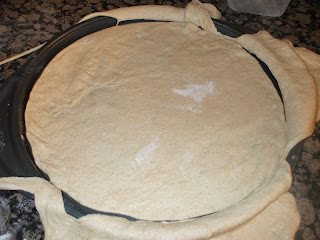
We like thinner crusts at our house so I just sprinkle some flour on the counter, throw down the dough and roll it out until it's pretty thin . Then I put it over our pizza pan like this:

The dough definitely overlaps the pan so I get a pizza cutter and cut off the excess. Thus we have a perfectly thin, and round pizza crust. I let it raise for 15 or 20 minutes then put it in the oven for 5 minutes.
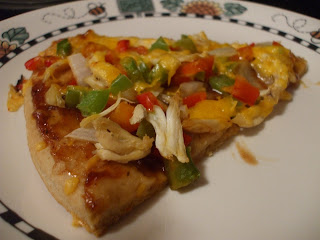
After it's been zapped in the oven we spread the bbq sauce and top it with yummy toppings like peppers, onions, chicken, cheese, tomatoes and any other veggies we have laying around. I put it in the oven for another 8 minutes or so and out comes a delightful pizza!

With the extra dough I made yummy breadsticks (you can see them below). Here's how I make them:
1. Roll out the extra dough, pretty thin
2. Use the pizza cutter to cut into strips.
3. Let raise for 20 minutes or so
4. Cook for 4 minutes
5. Brush with oil and sprinkle on parmesian cheese and garlic salt (those big salts like on preztels would be way good!)
6. Put in the oven for another 5 minutes.


And there you have a yummy, moderately simple recipe that is moderately healthy ( we could have cut back on the cheese :)

Tuesday, July 21, 2009

Strawberry Jam Catastrophe

So I was strolling down the isles of my favorite Henry's Market and I was shocked at the price of strawberries. 77 cents!!!!! I have never seen a pound of strawberries so cheap. So naturally I bought 18 pounds. (This picture is only showing half of them, I have an impulse problem! I was determined to make strawberry Jam so I got the pectin, sugar and strawberries and headed home for the big project.First I took the leaves off of them, I borrowed a GIGANTIC bowl from my neighbor. I don't think you can understand how many strawberries I bought, it was ridiculous.
Here are all of them, they almost took up the whole top shelf of the fridge.
So, I decided to use the freezer jam recipe inside of the pectin package. It called for 8 cups of mashed up strawberries. I didn't have a potato masher so I decided to throw the strawberries into the blender. BAD BAD IDEA! Apparently when you do this the strawberries expand and get all foamy. I didn't realize the problem at this point so I continued following the recipe. 8 cups of strawberries and 16 cups of sugar...seemed like a lot of sugar, but I just went for it. Notice how liquidy the stuff is.
My lovely assistant, Mariela, made the pectin and we added it to the strawberry/sugar mixture. I tasted the final mixture and it was SOOOO SUGARY. I started blending more strawberries and adding them into the mixture. DISASTER! I finally gave up.
I had all these empty cans from my grandma's applesauce so I decided to fill them anyways. The jam is pretty sugary, but I still loved it. It never set up, so I have to use a spoon, but it is great as syrup on pancakes!

After the catastrophe I started asking around and I got some help from family and friends, here are some lessons learned on freezer jam.
1. Just buy a potato masher for $5 and don't use a blender
2. Never add as much sugar as they say. My mom said that she never felt right about adding more sugar than fruit. (I'd like some help in this area still to get a feel for exactly how much sugar to add).
3. NEVER try to reinvent the wheel. I don't know why I didn't ask one of the 15 immediate relatives I have that already know how to make freezer jam for help. Next time I will be smarter!
I still have 5 quart bags full of strawberries that were leftover so I will be trying this again in a while when we run out of jam (probably not any time soon). Hopefully take two will be better!


Friday, June 5, 2009

Red Velvet Cake is a Scam!

Zac volunteered me to bake a Red Velvet Cake for his good friend's wife's surprise birthday party. I was a little nervous since I've never attempted red velvet cake and it sounds hard, but luckily Zac told me that his mom makes a delicious red velvet cake so I called her and gave it a whirl.

The reason it is a SCAM: I thought that there was something special about the ingredients of a red velvet cake that was very different from a normal cake that made it red like cherries or something...not true. You just add red food coloring, shocking. I was so surprised. I think I'll make blue velvet cake next time, just because I can. :) Nevertheless, this was a delicious, moist, WOW cake that I recommend, thank you Shelly for the recipe!

Here's the recipe:

Cake
2.5 C Flour
1.5 C Sugar
2 tsp Cocoa
1 tsp Salt
1 tsp vanilla
1 tsp baking soda
2 eggs
1 C oil
1 C Buttermilk ***
1/4 C Water
red food coloring (as much or little as you want)

Put it all in a big bowl, stir, put in pans, bake at 350 for 20-30 minutes depending on pan, just do the toothpick test. I used my 3 piece set of oval casserole dishes so I had to take them out at different times.
Frosting:
8 oz package softened cream cheese
1 cube real butter
2.5-3 C Powdered Sugar
1 tsp vanilla

Mix it all together and frost. I like to put it in the fridge to harden it up to make frosting it easier.

On my list of things to buy: Something to put a cake on besides a cookie sheet, the cookie sheet is SO tacky! Yuck!

Saturday, May 30, 2009

Chocolate Covered Cake Balls II

I meant to get a picture of the cake balls closer up. I put on a baby shower for my friend today and I attempted to decorate the cake balls. You can click on the picture to get a close up. I melted white chocolate and added food coloring and put it in a little cake decorating thing to decorate the tops but it was SOOOO difficult. The chocolate was all over the place. I definately am not an expert in this field. Oh well, they taste freakin awesome so I didn't care too much.
PS: We put peppers on the veggie tray and they were YUMMY, I've never thought to do that before since I'm not a huge raw pepper fan.

Tuesday, May 26, 2009

Chocolate Covered Cake Balls

I saw these on my friends Lisa's blog and then tried one at my friend Erin's house and I HAD to try them out. I'm doing a babyshower this weekend so I practiced them last weekend so I could get the hang of things. There are about a MILLION varieties using this same idea.
They have also been called 'Bakerella Balls' because that is the original creater. Here is a link to some of her other similar creations: link
1. Bake a cake-I chose chocolate.

2. Let the cake cool completely, then break it up into small pieces. Mix a container of cream cheese frosting with the cake. ( Other people have tried broken up oreos and broken up nutter butters)
3. Roll them into little balls and stick them in the freezer or fridge until they are nice and firm.
4. Dip them in chocolate and return them to the fridge to harden. I dipped them in melted hershey's kisses, melted white chocolate chips, and melted cookies and cream bars. The cookies and cream were definately my favorite! I heard that if you mix a little shortening with the melted chocolate the chocolate sticks better. I'll try that next time!
It makes a LOT, luckily we had plenty of friends to share them with or else I may have gained about 20 lbs! We had 85 balls!